
How to root Tecno K7, root tecno spark, root tecno k7 with magisk, root tecno k7 with superSU: On this page, we have taken our time to write a detailed guide on how to Root Tecno Spark K7 with superSU and Magisk. Want to have root on your Tecno K7? Then continue reading this guide.
Similar articles

Android users who like customising further their device will always look for a possible method to get it rooted. Since rooting will grant you admin privilege, it is, therefore, no surprise you will want your Tecno K7 rooted.
With root, Android users can as well easily install custom OS(Roms) and patches on their Android smartphone. With the use of a custom recovery like TWRP, rooting your Android device can easily be done by flashing superSU zip file or Magisk zip go gain root access.
But, it should be noted that most Androids come with a locked bootloader, and will need to be unlocked before flashing via fastboot. Also, you could decide to flash TWRP on your Tecno K7 MTK Android using sp flash tool.
On this page, we have taken our time to write a detailed guide on how to Root Tecno Spark K7 with superSU and Magisk. Want to have root on your Tecno K7? Then continue reading this guide.
[post_ads_2]
- [message]
- ##book## Read Also:
What is rooting?
Before you start, if you are new to rooting, then you will surely want to have a brief knowledge about rooting.
Rooting is the process of allowing users of smartphones, tablets and other devices running the Android mobile operating system to attain admin privileged control (known as root access) over various Android subsystems.
Once your device is rooted, you can install different MODs, kernel, ROMs on your device. You can install the latest Android updates on an old device by installing custom firmware or ROMs like CyanogenMod 13 or LineageOS.
What to note before you start
- Rooting your device will void the warranty.
- Make sure to install MTK drivers on your computer if you do not have it installed.
- You rooting your device is all at your own risk. We are not responsible for what will happen to your device when you apply this guide wrongly.
- In order not to be in harm's way, consider taking a backup of your system and userdata before applying this method.
- The rooting of Tecno K7 can be done via flashing the patched boot image file with SP Flash tool or via fastboot after bootloader unlock.
Rooting Tecno K7: What is required?
- Android MTK drivers
- Tecno K7 TWRP
- SuperSU zip for Tecno K7
- Magisk zip
- ADB+Fastboot drivers installed on your computer
- A USB Cable
Root Itel Spark K7 with SuperSU and Magisk: The steps.
To root your Tecno K7, the first thing you will have to do is install TWRP. And to do this, you will first need to unlock the bootloader. To unlock the bootloader, here are the steps:
First, make sure you have installed MTK drivers and ABD+Fastboot drivers on your computer.
Once these drivers are installed, proceed thus;
First, make sure you have installed MTK drivers and ABD+Fastboot drivers on your computer.
Once these drivers are installed, proceed thus;
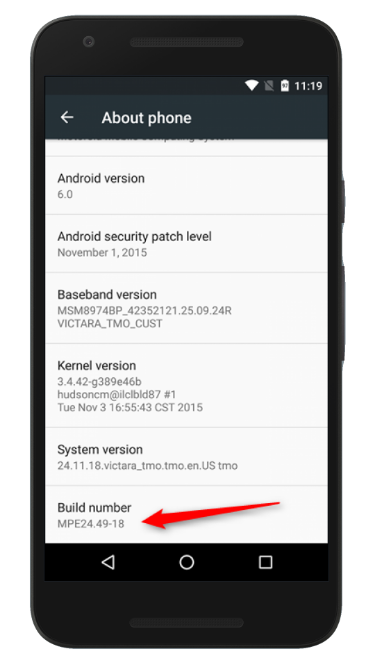
- Go to settings and then click on About phone.

- Next, in phone information, look for build number and hit on it until you get the message "You are now a developer"

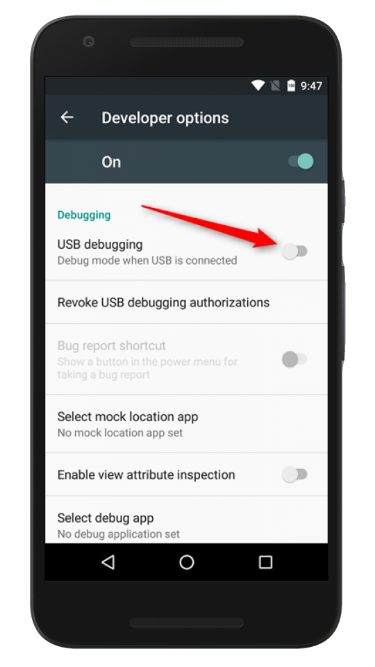
- Head back to the settings menu and locate "Developer options"

- Open the developer options and toggle on the dev options.
- Also, toggle on OEM unlocking.

- Next, head down and enable USB debugging. Confirm and then connect your phone to the computer? Where you are prompted to grant permission, confirm it.

Once you have already enabled USB debugging, power off your device and let's move to the rooting proper!
- Power your Tecno into bootloader mode by pressing Vol- and power key
- Open the ADB folder on the C:\ ABD drive and open a new command line using SHIFT + Right-click.
- Once you have done that, send the following command
- [message]
- ##code## checking device:
- fastboot devices
- Next, to unlock the bootloader, use the following command.
- [message]
- ##code## Unlocking bootloader:
- fastboot oem unlock
Now that the bootloader has been unlocked, we can now proceed with the flashing of the TWRP.
1. Root Tecno Spark K7: Flashing TWRP via fastboot
The steps are simple. Boot into fastboot mode using the Volume down Key + Power and then connect your device to the PC. Then, follow these steps:
- Open a command prompt from the ADB folder on your C:\ drive and then use these commands to flash the TWRP(rename the TWRP to something like twrp. That is file should be "twrp.img"). You will need to copy the twrp to the folder ADB on the C:\ drive as well.
- [message]
- ##code## check device connection:
- fastboot devices
Once you've confirmed the device is connected in fastboot mode, then use the following command to flash the TWRP
- [message]
- ##code## flash twrp.img
- fastboot flash recovery twrp.img
It should be noted that this process will erase your data, so consider making a backup before you proceed.
2. Rooting Tecno K7 with SuperSU.
Now that TWRP has been installed on your Tecno Spark K7, rooting can now be done with SuperSU zip easily. The process is simple to apply even for a newbie.
Before you root your device with SuperSU, check out some of the advantages of rooting your Android.
Advantages of rooting
- Support for themes, allowing everything to be visually changed from the colour of the battery icon to the boot animation that appears while the device is booting, and more.
- Full control of the kernel, which, for example, allows overclocking and underclocking the CPU and GPU.
- Full application control, including the ability to backup, restore, or batch edit applications, or to remove bloatware that comes pre-installed on many phones.
- Custom automated system-level processes through the use of third-party applications.
- Ability to install a custom firmware (also known as a custom ROM) or software (such as Xposed, Magisk, BusyBox, etc.) that allows additional levels of control on a rooted device.
- [message]
- ##book## Read the full guide:
3. Root Tecno Spark K7 with Magisk
Rooting Android phones can be done with Magisk as well. Magisk is the best alternative to Chainfire’s SuperSU.
Magisk works systemless-ly, and it doesn’t modify or alter your system partition. If you want to install a banking application or if you want to install official OTA updates, and much more. You can install the OTA updates without losing the root privileges, and that is everyone need. They don’t need to root again and again.
Magisk roots your Android device and it is based on phh’s SuperUser. Magisk is an open-source rooting solution for Android. If you want to install magisk, then you can do so with the help of Magisk Manager application.
You can root using the Magisk Manager apk where you will need to use it to patch the boot image of your device and flash it, or install Magisk zip via the recovery(TWRP required).
For this guide, we will be using Magisk zip file. To root your Tecno with Magisk, the steps are similar to rooting with SuperSU zip once TWRP is installed.
Magisk features:
Magisk Hide:
Hide Magisk from detection, including SafetyNet, which is used in Android Pay, Pokemon GO etc.
Resetprop:
Allow you to do any modifications to system props (build.prop), including read-only props.
Multiple Entry Points:
Provide several entry points to developers, reliably pausing the boot process before everything is done.
Include post-fs (cache) mode, which happens even earlier than data is mounted (used to replace Boot Animation etc.)
Standard Stuff:
Remove dm-verity, forencrypt; includes a super complete busybox to guarantee consistent behaviour, and can also be toggled to be used universally.
Magic Mount:
Allow you to do any system (vendor) modification without actually tampering the partitions.
MagiskSU: Open Source Root Solution
Root your device with MagiskSU, based on phh’s Superuser, which is based on CM Superuser.
Magisk Manager:
MagiskSU Root Management, Install / Upgrade Magisk in-app,
Manage, Upgrade, Download, Install Magisk Modules within a few taps.
Rooting with magisk
- Download Magisk module and transfer to your device storage or external SD Card.
- Next, boot your Tecno Spark K7 into recovery mode(TWRP mode)
- From the TWRP menu, click on "Install".
- Locate the Magisk module zip file and tap on it to install.
- Swipe to confirm flashing of Magisk. The process will then begin. It will take a couple of minutes to complete.
- Once the flashing is done,
- Once the zip is successfully installed, go to "Wipe cache/Dalvik" option, select it and then do "Swipe to wipe" on the bottom of the screen.
- Once done, reboot your device from the TWRP main menu.
- The next thing to do is download and install Magisk Manager apk to manage root.
Disclaimer
This guide is writing with a good mind and with the hopes to help you root your Tecno K7 Android MTK device. But this does not imply we will be responsible for the damage you may cause to your device trying to apply this guide. So, follow this at your own risk.
[post_ads-2]
[post_ads-2]
Conclusion
This guide is a simple and straight forward tutorial on how to Root Tecno Spark K7 using SuperSU and Magisk. Following this guide, you should be able to root and install custom ROMs and patches on your Tecno K7.
The process of rooting Tecno K7 includes; Unlocking the bootloader, installing a custom recovery(TWRP), and then installing either SuperSU or Magisk zip.
Note that you are not to install both SuperSU and Magisk in order to gain admin privilege(Root access) on your Tecno K7.
Have issues applying this guide? Speak to us!


COMMENTS