Have a Tecno Spark Go and will like to root it? Then you have come to the right place. This easy to apply rooting guide will walk you via the steps of
Have a Tecno Spark Go and will like to root it? Then you have come to the right place. This easy to apply rooting guide will walk you via the steps of installing TWRP and rooting your Tecno Spark Go.
The Tecno Spark Go comes with a 6.52-inch touchscreen display with a resolution of 720x1600 pixels and an aspect ratio of 19.5:9.
It is powered by a 1.8GHz quad-core MediaTek Helio A20 processor. It comes with 2GB of RAM. The Tecno Spark Go 2020 runs Android 10 and is powered by a 5000mAh battery.
The Tecno Spark Go runs HiOS 6.2 is based on Android 10 and packs 32GB of inbuilt storage that can be expanded via microSD card (up to 256GB) with a dedicated slot.
The 3G/4G Tecno Spark Go 2020 is a dual-SIM (GSM and GSM) smartphone that accepts Nano-SIM and Nano-SIM cards. It measures 165.60 x 76.30 x 9.10mm (height x width x thickness). It was launched in Aqua Blue and Ice Jadeite colours.
Advantages of root
- Rooting breaks apps out of Android’s normal security sandbox. Apps could abuse root privileges you’ve granted and snoop on other apps, something which isn’t normally possible. In fact, Google prevents you from using Android Pay on rooted devices for this reason.
- Some manufacturers assert that rooting voids your device’s warranty. However, rooting will not actually damage your hardware. In many cases, you can “unroot” your device and manufacturers won’t be able to tell if it’s been rooted.
- As usual, you do this at your own risk. Rooting should generally be a very safe process, but you’re on your own here. If you mess something up, you can’t just expect free warranty service to fix it. If you’re worried, do a bit of research first and see if other people report success rooting your device with the tool you’re planning on using.
What to note
- Rooting your device will void the warranty.
- Make sure to install MTK drivers if you do not have them installed.
- You rooting your device is all at your own risk. We are not responsible for what will happen to your device when you apply this guide wrongly.
- In order not to be in harm's way, consider taking a backup of your system and userdata before applying this method.
- The rooting of Tecno Spark Go can be done via flashing the patched boot image file with the SP Flash tool or via fastboot after the bootloader is unlocked.
Requirements
Enabling USB debugging
- Go to settings and then click on About phone.
- Next, in phone information, look for build number and hit on it until you get the message "You are now a developer"
- Head back to the settings menu and locate "Developer options"
- Open the developer options and toggle on the dev options.
- Also, toggle on OEM unlocking.
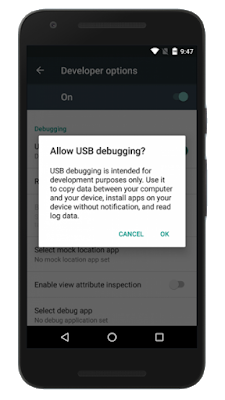
- Next, head down and enable USB debugging. Confirm and then connect your phone to the computer? Where you are prompted to grant permission, confirm it.
Flashing TWRP
- Download & extract ADB Minimal Tool
- Download and Extract recovery.img In Platform tools (ADB Minimal Tool) Folder.
- Reboot Phone to bootloader by together holding Volume Down and Power Button
- Connect Phone to PC using the usb cable.
- open CMD in the Platform tools Folder and Send run the following Code to check if the device is connected.
- Next, unlock the bootloader using the following code
- And now to flash the TWRP, send the code below and hit enter
Rooting your Tecno Spark Go
- Download and transfer the Magisk and the No verity Opt Encrypt zip files to your internal storage or SD Card.
- Reboot your phone into twrp recovery.
- Now, click on the Install button in the TWRP recovery.
- Navigate to your internal storage or SD Card and locate the Magisk zip.
- Tap on it and swipe to install.
- Wait for the installation to complete.
- After successful installation of Magisk, go through the same steps and install the No verity Opt Encrypt.
- Next, reboot your device. Download and install Magisk Manager to manage root access.


COMMENTS